How to Bypass Cloudflare Protection and Turnstile Using Scrapeless | Complete Guide
Advanced Data Extraction Specialist
Introduction
Web scraping is becoming increasingly difficult due to advanced security mechanisms like Cloudflare Protection and Cloudflare Turnstile. These challenges are designed to block automated access and make it difficult for bots to retrieve data. However, with the Scrapeless Scraping Browser, you can efficiently bypass these restrictions and continue scraping without interruptions.
In this guide, we’ll cover three key aspects of bypassing Cloudflare challenges:
- How to Bypass Cloudflare Protection Using Scrapeless Browser – Learn how to bypass security measures such as CAPTCHA and bot detection.
- How to Retrieve and Use cf_clearance Cookie and Request Headers – Understand how to extract and use cf_clearance cookies to maintain session persistence.
- How to Bypass Cloudflare Turnstile Using Scrapeless Browser – Discover how to bypass the Turnstile challenge and automate your scraping tasks.
By the end of this tutorial, you’ll have a complete strategy for handling Cloudflare protection effectively. Let's get started!
Part 1: How to Bypass Cloudflare Protection Using Scrapeless
This guide will show you how to use Scrapeless Scraping Browser and Puppeteer-core to bypass Cloudflare protection on websites.
Scraping Browser Key Features
- 🛡️ Effortless Protection Bypass: Scrapeless Browser lets you bypass Cloudflare's advanced security measures, including CAPTCHAs and Turnstile, ensuring uninterrupted access to your target data.
- ⚡ Lightning-Fast Scraping: With Scrapeless Browser, you can automate scraping tasks efficiently without compromising on speed or accuracy.
- 🔧 Total Customization: Customize your setup with proxy settings, user agents, and more, giving you full control over your scraping environment.
- 👨👩👧👦 Community Support: Tap into our Discord server for instant answers to your questions and support from other experienced users.
- 🔌 Seamless Integration: Easily integrate Scrapeless Browser with your existing scripts, and get started on your web scraping journey immediately.
Step 1: Preparation
1.1 Create a Project Folder
-
Create a new folder for the project, e.g., scrapeless-bypass.
-
Navigate to the folder in your terminal:
cd path/to/scrapeless-bypass1.2 Initialize a Node.js Project
Run the following command to create a package.json file:
npm init -y1.3 Install Required Dependencies
Install Puppeteer-core, which allows remote connections to a browser instance:
npm install puppeteer-coreIf Puppeteer is not already installed on your system, install the full version:
npm install puppeteer puppeteer-coreStep 2: Get the Scrapeless API Key
2.1 Register on Scrapeless
-
Go to Scrapeless and create an account.
-
Navigate to the API Key Management section.
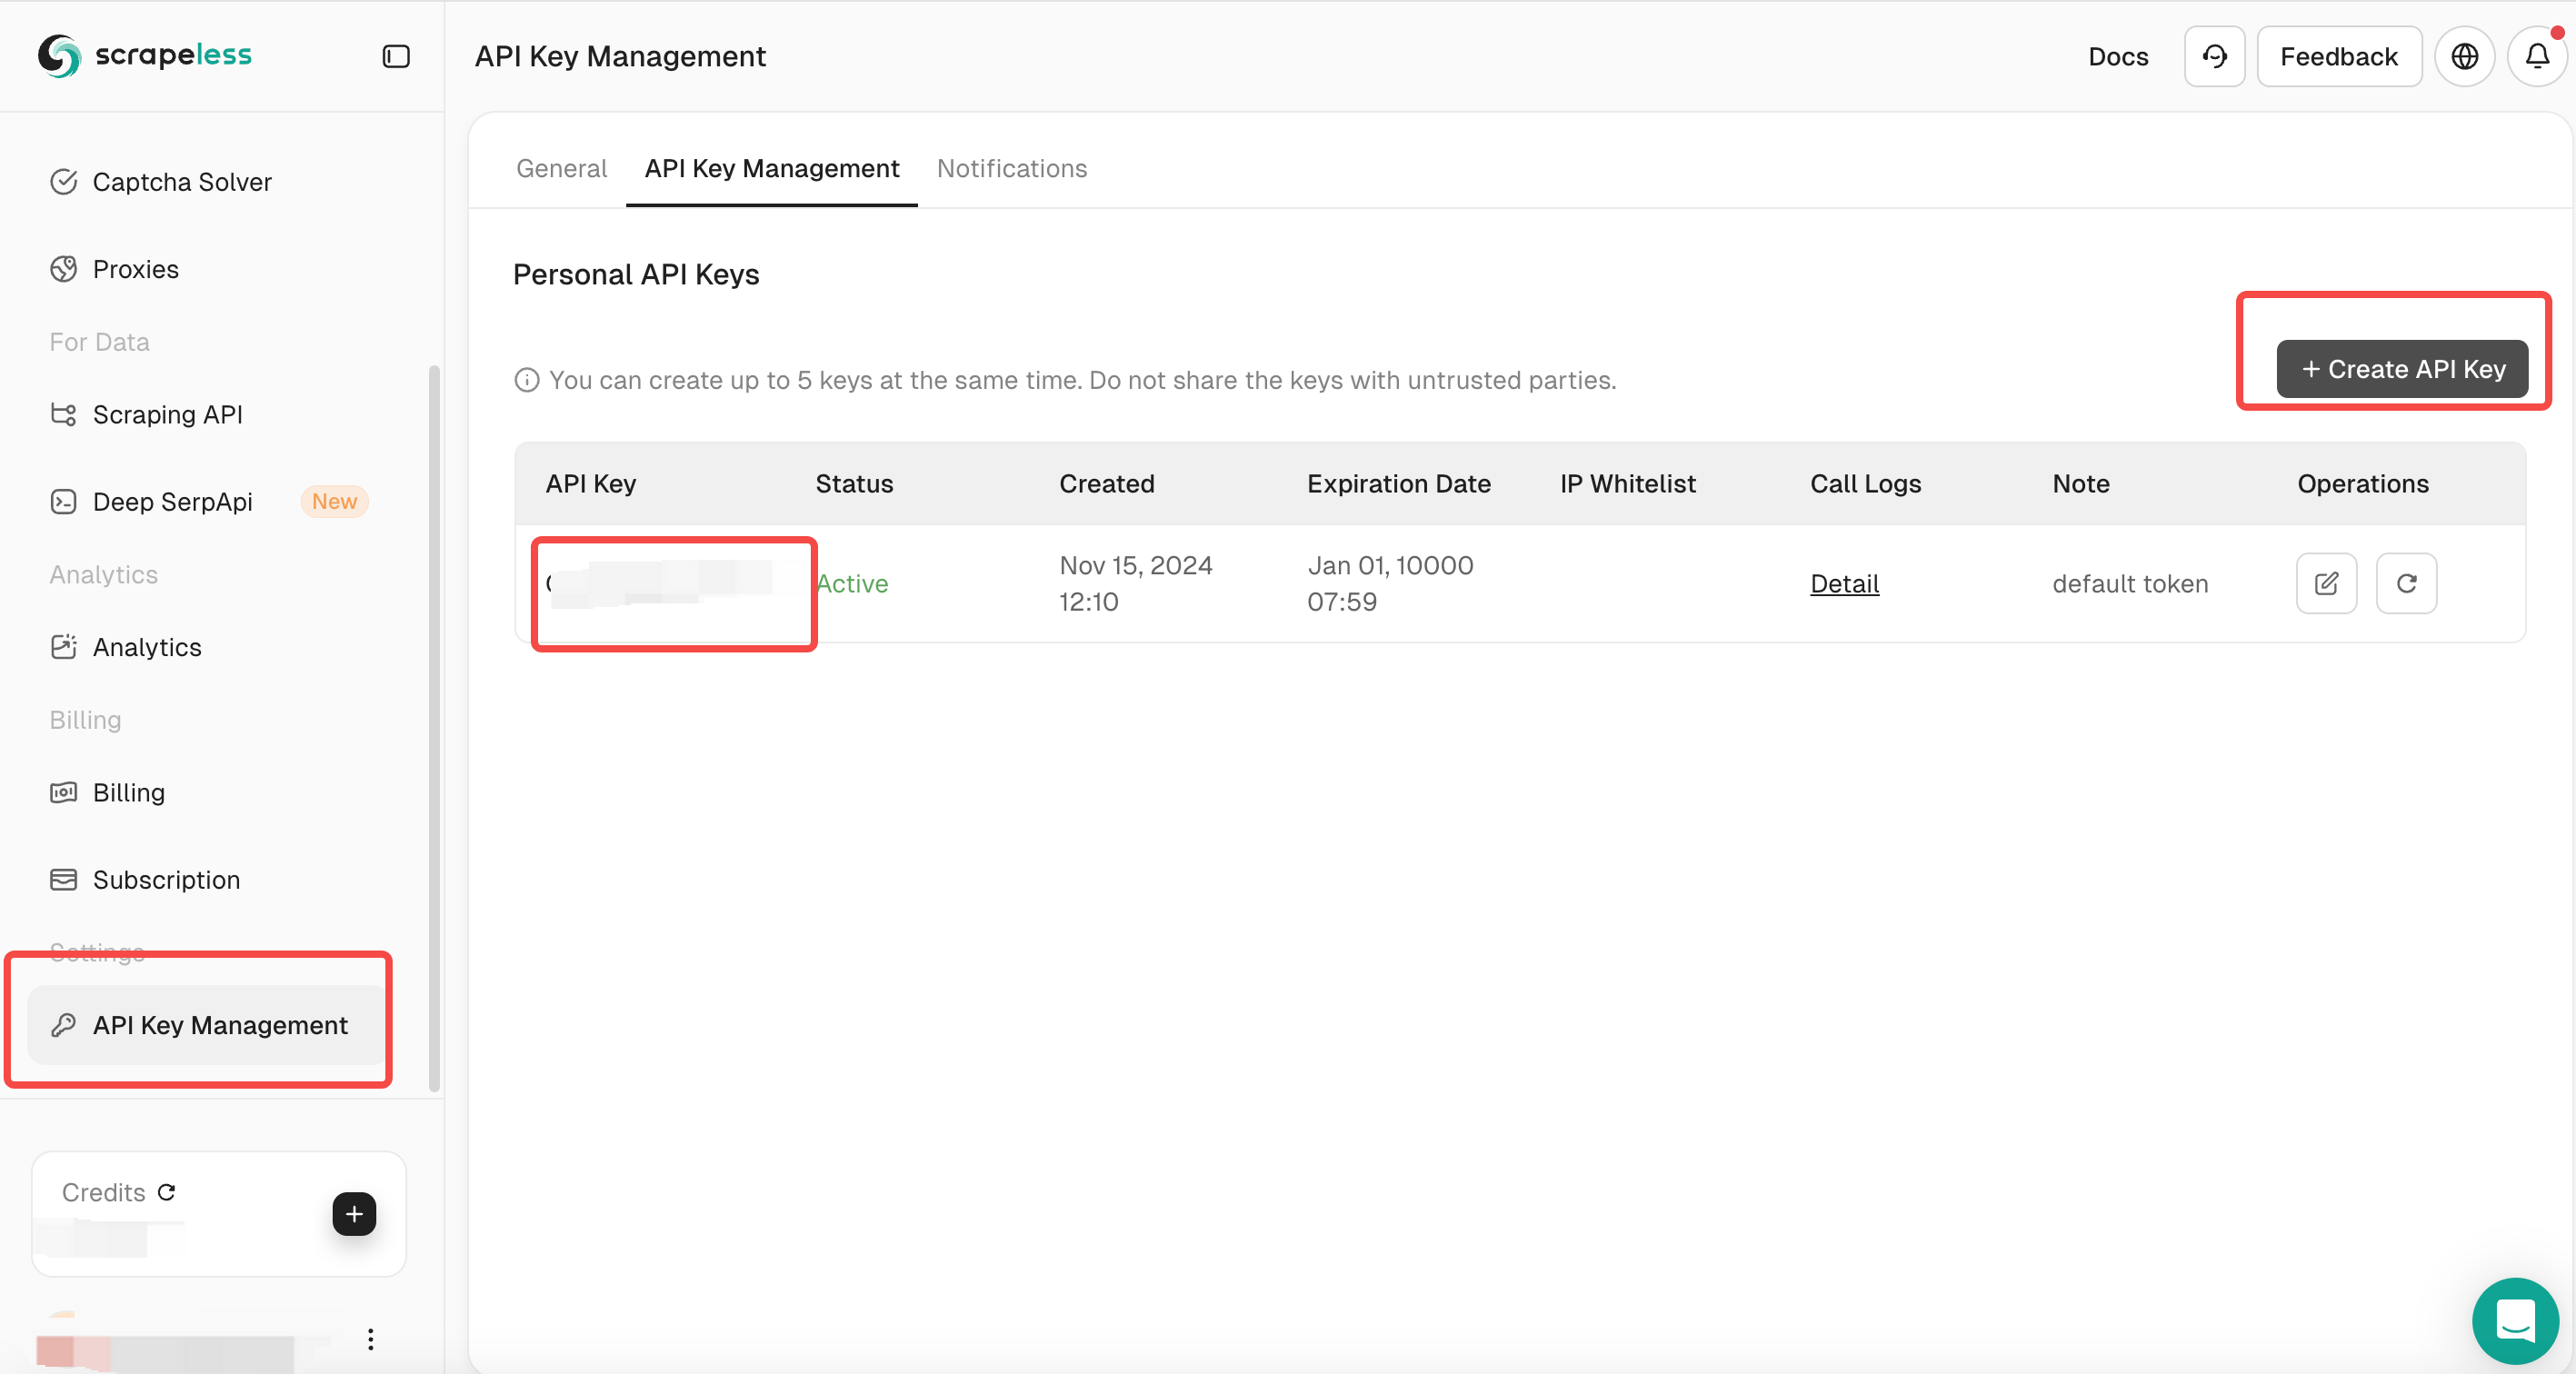
- Generate a new API Key and copy it.
🚀 Ready to dive deeper into bypassing Cloudflare protections?
👉 Log in now to access advanced features and tutorials!
🔒 Need extra help? Join our Discord community for real-time support and updates!
📈 Start scraping smarter with Scrapeless Browser today!"
Step 3: Connect to Scrapeless Browserless
3.1 Obtain the WebSocket Connection URL
Scrapeless provides a WebSocket connection URL for Puppeteer to interact with a cloud-based browser.
The format is:
wss://browser.scrapeless.com/browser?token=APIKey&session_ttl=180&proxy_country=ANYReplace APIKey with your actual Scrapeless API Key.
3.2 Set Up Connection Parameters
-
token: Your Scrapeless API Key
-
session_ttl: Browser session duration in seconds (e.g., 180 seconds)
-
proxy_country: The country code for the proxy server (e.g., GB for the UK, US for the USA)
Step 4: Write the Puppeteer Script
4.1 Create the Script File
Inside your project folder, create a new JavaScript file named bypass-cloudflare.js.
4.2 Connect to Scrapeless and Launch Puppeteer
Add the following code to bypass-cloudflare.js:
import puppeteer from 'puppeteer-core';

const API_KEY = 'your_api_key'; // Replace with your actual API Key
const host = 'wss://browser.scrapeless.com';
const query = new URLSearchParams({
  token: API_KEY,
  session_ttl: '180', // Browser session duration in seconds
  proxy_country: 'GB', // Proxy country code
  proxy_session_id: 'test_session', // Proxy session ID (keeps the same IP)
  proxy_session_duration: '5' // Proxy session duration in minutes
}).toString();

const connectionURL = `${host}/browser?${query}`;

const browser = await puppeteer.connect({
  browserWSEndpoint: connectionURL,
  defaultViewport: null,
});
console.log('Connected to Scrapeless');
4.3 Open a Web Page and Bypass Cloudflare
Extend the script to open a new page and navigate to a Cloudflare-protected website:
const page = await browser.newPage();
await page.goto('https://www.scrapingcourse.com/cloudflare-challenge', { waitUntil: 'domcontentloaded' });
4.4 Wait for Page Elements to Load
Ensure that Cloudflare protection is bypassed before proceeding:
await page.waitForSelector('main.page-content .challenge-info', { timeout: 30000 }); // Adjust selector as needed4.5 Capture a Screenshot
To verify the successful bypass of Cloudflare protection, take a screenshot of the page:
await page.screenshot({ path: 'challenge-bypass.png' });
console.log('Screenshot saved as challenge-bypass.png');
4.6 Complete Script
Here is the full script:
import puppeteer from 'puppeteer-core';

const API_KEY = 'your_api_key'; // Replace with your actual API Key
const host = 'wss://browser.scrapeless.com';
const query = new URLSearchParams({
  token: API_KEY,
  session_ttl: '180',
  proxy_country: 'GB',
  proxy_session_id: 'test_session',
  proxy_session_duration: '5'
}).toString();

const connectionURL = `${host}/browser?${query}`;

(async () => {
  try {
    // Connect to Scrapeless
    const browser = await puppeteer.connect({
      browserWSEndpoint: connectionURL,
      defaultViewport: null,
    });
    console.log('Connected to Scrapeless');

    // Open a new page and navigate to the target website
    const page = await browser.newPage();
    await page.goto('https://www.scrapingcourse.com/cloudflare-challenge', { waitUntil: 'domcontentloaded' });

    // Wait for the page to load completely
    await page.waitForTimeout(5000); // Adjust delay if necessary
    await page.waitForSelector('main.page-content', { timeout: 30000 });

    // Capture a screenshot
    await page.screenshot({ path: 'challenge-bypass.png' });
    console.log('Screenshot saved as challenge-bypass.png');

    // Close the browser
    await browser.close();
    console.log('Browser closed');
  } catch (error) {
    console.error('Error:', error);
  }
})();
Step 5: Run the Script
5.1 Save the Script
Ensure the script is saved as bypass-cloudflare.js.
5.2 Execute the Script
Run the script using Node.js:
node bypass-cloudflare.js5.3 Expected Output
If everything is set up correctly, the terminal will display:
Connected to Scrapeless
Screenshot saved as challenge-bypass.png
Browser closed
The challenge-bypass.png file will appear in your project folder, confirming that Cloudflare protection has been bypassed successfully.
🌟 Want to bypass Cloudflare protection with ease?
🔑 Log in here and start leveraging Scrapeless Browser’s powerful tools today!
🚀 Need expert guidance? Join our Discord community for exclusive tips and troubleshooting help!
💡 Get ahead in web scraping with Scrapeless Browser—secure, fast, and reliable!"
Step 6: Additional Considerations
6.1 API Key Usage
-
Ensure your API Key is valid and has not exceeded its request quota.
-
Never expose your API Key in public repositories (e.g., GitHub). Use environment variables for security.
6.2 Proxy Settings
-
Adjust the proxy_country parameter to select a different location (e.g., US for the USA, DE for Germany).
-
Use a consistent proxy_session_id to maintain the same IP address across requests.
6.3 Page Selectors
-
The structure of target websites may vary, requiring adjustments to waitForSelector().
-
Use page.evaluate() to inspect the page structure and update selectors accordingly.
This guide has provided a step-by-step method to use Scrapeless and Puppeteer-core for bypassing Cloudflare protection. By leveraging WebSocket connections, proxy settings, and element monitoring, you can efficiently automate web scraping without being blocked by Cloudflare.
Part 2: How to Retrieve and Use cf_clearance Cookie and Request Headers
After successfully bypassing the Cloudflare challenge, you can retrieve the request headers and the cf_clearance cookie from the successful page response. These elements are crucial for maintaining session persistence and avoiding repeated challenges.
1. Retrieve cf_clearance Cookie
const cookies = await browser.cookies();
const cfClearance = cookies.find(cookie => cookie.name === 'cf_clearance')?.value;
Purpose:
-
This code fetches all cookies, including cf_clearance, which is issued by Cloudflare after passing its security challenge.
-
The cf_clearance cookie allows subsequent requests to bypass Cloudflare’s protection, reducing the need for repeated challenges.
2. Enable Request Interception and Capture Headers
await page.setRequestInterception(true);
page.on('request', request => {
  // Match page requests after Cloudflare challenge
  if (request.url().includes('https://www.scrapingcourse.com/cloudflare-challenge') && request.headers()?.['origin']) {
    const accessRequestHeaders = request.headers();
    console.log('[access_request_headers] =>', accessRequestHeaders);
  }
  request.continue();
});
Purpose:
-
Enable request interception (setRequestInterception(true)) to monitor and modify network requests.
-
Listen for request events, triggering whenever Puppeteer sends a network request.
-
Identify Cloudflare challenge requests:
-
request.url().includes('https://www.scrapingcourse.com/cloudflare-challenge') ensures only relevant requests are intercepted.
-
request.headers()?.['origin'] helps verify legitimate access.
-
Extract and print request headers, which can later be used to simulate real browser requests.
-
Continue the request (request.continue()) to prevent disruptions in page loading.
🔍 Looking to capture and use Cloudflare’s cf_clearance cookie effectively?
💪 Log in now to access all advanced features for smoother scraping.
3. Why Retrieve cf_clearance and Headers?
- Session Persistence:
-
The cf_clearance cookie allows subsequent HTTP requests to skip Cloudflare challenges.
-
This cookie can be reused across multiple requests, minimizing verification prompts.
- Simulating Real Browser Requests:
-
Cloudflare examines request headers such as User-Agent, Referer, and Origin.
-
Capturing the headers from a successful request ensures future requests can mimic legitimate traffic, reducing detection risks.
- Enhanced Crawling Efficiency:
- These details can be stored in a database or file and reused, preventing unnecessary challenges and optimizing request success rates.
By implementing these techniques, you can improve the reliability and efficiency of web scraping, effectively bypassing Cloudflare’s security measures. 🚀
Part 3: How to Bypass Cloudflare Turnstile Using Scrapeless Browser
In this part of the tutorial, we will learn how to bypass Cloudflare Turnstile protection using Scrapeless Browser with Puppeteer. Cloudflare Turnstile is a more advanced security mechanism used to block bots and automated scraping. With the help of Scrapeless Browser, we can bypass this protection to interact with the website as if we were a real user.
Note:
"Bypass Cloudflare Protection" and "Cloudflare Turnstile Bypass" target different security mechanisms.
- Bypass Cloudflare Protection involves bypassing general Cloudflare security measures like CAPTCHA, JavaScript checks, and IP rate limiting.
- Cloudflare Turnstile Bypass specifically targets Cloudflare's Turnstile, a unique anti-bot challenge that ensures human interaction, without relying on traditional CAPTCHA. Bypassing Turnstile defeats this specific security mechanism.
Step 1: Open the Target Page
We will start by opening a webpage that is protected by Cloudflare Turnstile, which typically requires human verification. Below is the code that opens the webpage.
const page = await browser.newPage();
await page.goto('https://www.scrapingcourse.com/login/cf-turnstile', { waitUntil: 'domcontentloaded' });
This code uses page.goto() to navigate to the page and waits until the DOM content has loaded.
Step 2: Fill in Login Credentials
Once the page is loaded, we can automate the process of filling out the login credentials (such as username and password) to pass the login page.
await page.locator('input[type="email"]').fill('admin@example.com');
await page.locator('input[type="password"]').fill('password');
Step 3: Wait for Turnstile to Unlock
Cloudflare Turnstile works by ensuring that only human users can proceed. In this step, we will wait for Turnstile to be unlocked by checking if the response is received from the Turnstile verification process.
await page.waitForFunction(() => {
  return window.turnstile && window.turnstile.getResponse();
});
This line of code waits for the response from window.turnstile.getResponse(), which indicates that the Turnstile verification has been successfully bypassed.
💥 Unlock content behind Cloudflare Turnstile with ease.
🔓 Log in to gain access to powerful scraping features.
💬 Join our Discord community for personalized help, tips, and user insights!
🚀 Streamline your web scraping with Scrapeless Browser—overcome any barrier, including Cloudflare’s toughest challenges!"
Step 4: Take a Screenshot to Verify
To confirm that the bypass was successful, we can take a screenshot of the page. This helps us verify that Turnstile is successfully bypassed.
await page.screenshot({ path: 'challenge-bypass-success.png' });Step 5: Click the Login Button
After successfully bypassing the Turnstile challenge, we can simulate the user clicking the login button to submit the form.
await page.locator('button[type="submit"]').click();
await page.waitForNavigation();
This code clicks the submit button and waits for the page to navigate to the next page after login.
Step 6: Take Another Screenshot of the Next Page
Finally, once we’ve logged in, we’ll take another screenshot to confirm that the navigation to the next page was successful.
await page.screenshot({ path: 'next-page.png' });Complete Code Example
Here's the complete code that incorporates all the steps outlined above:
const page = await browser.newPage();
await page.goto('https://www.scrapingcourse.com/login/cf-turnstile', { waitUntil: 'domcontentloaded' });
await page.locator('input[type="email"]').fill('admin@example.com');
await page.locator('input[type="password"]').fill('password');

// Wait for Turnstile to unlock successfully
await page.waitForFunction(() => {
  return window.turnstile && window.turnstile.getResponse();
});

// Take screenshot after bypass
await page.screenshot({ path: 'challenge-bypass-success.png' });

// Click the login button
await page.locator('button[type="submit"]').click();
await page.waitForNavigation();

// Take screenshot of the next page
await page.screenshot({ path: 'next-page.png' });
By following this tutorial, you've successfully learned how to bypass Cloudflare Turnstile protection using Scrapeless Browser and Puppeteer. This approach allows you to interact with a website, fill out login forms, and navigate through the content while bypassing Cloudflare’s security mechanisms. You can extend this technique to work with other websites protected by Turnstile.
Ready to Master Cloudflare Bypass and Web Scraping with Scrapeless Browser?
🚀 Unlock the full power of Scrapeless Browser today and start bypassing Cloudflare protection, retrieving cookies and headers, and bypassing Turnstile challenges with ease!
🔑 Log in here to access exclusive features and start scraping with confidence.
💬 Join our Discord community to connect with other scraping experts, get troubleshooting help, and stay updated with the latest tips and tricks.
💡 Don’t miss out on powerful tools and insights to take your web scraping to the next level with Scrapeless Browser.
Conclusion
Successfully bypassing Cloudflare security requires the right tools and strategies. With Scrapeless Browser, you can easily navigate Cloudflare’s defenses, retrieve necessary cookies and headers, and overcome the Turnstile challenge without manual intervention.
🔑 Sign up now and take your web scraping to the next level!
💬 Need help? Join our Discord community to get expert insights, troubleshooting support, and stay ahead of the latest web scraping techniques.
Don’t let Cloudflare slow you down—unlock seamless scraping today!
FAQ: Cloudflare Bypass, cf_clearance Cookie, and Turnstile Challenges
1. What is Cloudflare Protection, and why does it block web scrapers?
Cloudflare Protection is a security service that detects and mitigates automated traffic. It uses techniques like CAPTCHAs, JavaScript challenges, and IP rate limiting to prevent bots from accessing protected content.
2. What is cf_clearance, and how does it help bypass Cloudflare?
The cf_clearance cookie is issued after a successful Cloudflare challenge. It allows a browser session to remain verified for a specific duration, preventing further challenges. By retrieving and reusing this cookie, scrapers can maintain uninterrupted access.
3. How does Cloudflare Turnstile differ from standard Cloudflare protection?
Cloudflare Turnstile is an advanced challenge designed to verify human presence without traditional CAPTCHAs. It uses behavioral analysis and other verification techniques to block bots. Bypassing Turnstile requires automated workflows that mimic real user interactions.
4. Is using Scrapeless Browser legal for bypassing Cloudflare?
The legality of bypassing Cloudflare depends on the website’s terms of service and local regulations. Always ensure that your scraping activities comply with the website’s policies and applicable laws.
5. How can I start using Scrapeless Browser for Cloudflare bypass?
You can get started by logging into Scrapeless Browser and following the steps in this guide to implement automated bypass solutions.
6. Where can I get support for Scrapeless Browser?
Join our Discord community to connect with other developers, get troubleshooting help, and stay updated with new features and best practices.
Other Resources
How to Bypass Cloudflare With Puppeteer
Learn how to use Puppeteer to bypass Cloudflare’s protections and access web content without triggering security challenges.
How to Use Undetected ChromeDriver for Web Scraping
Discover techniques for using an undetected ChromeDriver instance to avoid detection while scraping websites.
How to Scrape Google Hotel Prices with Node.js
Step-by-step guide on scraping Google Hotel price data using Node.js and handling anti-bot mechanisms effectively.
How to Scrape Google Finance Ticker Quote Data in Python
A Python-based tutorial on extracting Google Finance ticker quotes, including handling JavaScript-rendered data.
At Scrapeless, we only access publicly available data while strictly complying with applicable laws, regulations, and website privacy policies. The content in this blog is for demonstration purposes only and does not involve any illegal or infringing activities. We make no guarantees and disclaim all liability for the use of information from this blog or third-party links. Before engaging in any scraping activities, consult your legal advisor and review the target website's terms of service or obtain the necessary permissions.


