How to Use Selenium with PowerShell [Tutorial 2025]
Emily Chen
Advanced Data Extraction Specialist
01-Mar-2025
Selenium remains a popular choice for web scraping and testing via browser automation. These tasks are traditionally written using scripting languages, including PowerShell. To leverage Selenium's capabilities with PowerShell, the developer community created dedicated bindings that make this integration possible.
However, web scraping has become increasingly challenging due to sophisticated anti-bot systems like Cloudflare. In this comprehensive guide, you'll explore:
Getting started with Selenium and PowerShell
Interacting with web pages in a browser
Avoiding blocks from anti-bot systems
Solving Cloudflare challenges with Scrapeless Scraping Browser
Let's dive in!
Can You Use Selenium With PowerShell?
Selenium is the most popular headless browser library in the IT community. Its rich and consistent API makes it perfect for building browser automation scripts for testing and web scraping.
PowerShell is a powerful command shell available on both Windows client and server environments. Browser automation complements scripting perfectly, which is why the developer community created selenium-powershell, a port of Selenium WebDriver for PowerShell.
Even though the library is currently seeking maintainers, it remains the go-to module for web automation in PowerShell.
Note: If you need to brush up on the basics before jumping into this Selenium PowerShell tutorial, review the fundamentals of headless browser scraping and web scraping with PowerShell.
Web Scraping with Selenium and PowerShell: The Basics
Note: The examples in this article are designed for Windows operating systems, as some features like Selenium-PowerShell module and COM objects are Windows-specific. If you're using macOS or Linux, you may need to adapt these scripts accordingly.
In this section, we'll introduce the basic concepts of using Selenium with PowerShell. Before jumping into more complex Cloudflare-protected sites like G2, it's helpful to understand the fundamentals.
Our Target: G2 Reviews
For this tutorial, we'll focus on scraping reviews from G2, specifically Airtable reviews at: https://www.g2.com/products/airtable/reviews. This is a real-world example of a Cloudflare-protected site that presents challenges for traditional scraping methods.
Here's what makes G2 an interesting target:
It's protected by Cloudflare, which blocks most basic scraping attempts
It contains valuable business software reviews that could be useful for market research
The reviews are structured in a way that makes them ideal for data extraction
It represents the type of high-value business data that often sits behind anti-bot systems
Let's first see how a traditional Selenium with PowerShell approach would struggle with this site, then how Scrapeless can solve the problem.
Getting the Right Chrome WebDriver (February 2025)
A critical step when setting up Selenium with PowerShell is ensuring you have the correct ChromeDriver version that matches your Chrome browser. As of February 28, 2025, here are the latest Chrome versions and their corresponding WebDrivers:
Chrome Stable (133.0.6943.141):
ChromeDriver for Windows 64-bit: chromedriver-win64.zip
ChromeDriver for Windows 32-bit: chromedriver-win32.zip
ChromeDriver for Mac (Intel): chromedriver-mac-x64.zip
ChromeDriver for Mac (M1/M2): chromedriver-mac-arm64.zip
ChromeDriver for Linux: chromedriver-linux64.zip
If you're using a different Chrome version (Beta, Dev, or Canary), make sure to download the matching ChromeDriver from the corresponding section of the Chrome for Testing download page.
Download the appropriate ChromeDriver for your system, extract the ZIP file, and place the executable in your project folder. Then reference this location in your PowerShell script:
Using the correct ChromeDriver version is essential - if there's a version mismatch, Selenium will throw errors and fail to control Chrome properly.
Attempting to Scrape G2 with Basic Selenium
Now, let's try to access G2 reviews with our basic Selenium setup:
Copy
Import-Module -Name Selenium

# Initialize Selenium WebDriver
$Driver = Start-SeChrome -WebDriverDirectory './chromedriver-win64' -Headless

# Visit G2 reviews page
Enter-SeUrl 'https://www.g2.com/products/airtable/reviews' -Driver $Driver

# Wait a moment for page to load
Start-Sleep -Seconds 5

# Get the page title
$Title = $Driver.Title
Write-Host "Page title: $Title"

# Print the page source
$Html = $Driver.PageSource
$Html | Out-File -FilePath "g2_response.html"

# Close the browser
Stop-SeDriver -Driver $Driver
When you run this script, instead of getting the actual G2 reviews page, you'll likely see:
The Cloudflare challenge page
A title like "Just a moment..." or "Checking your browser..."
HTML that contains Cloudflare's JavaScript challenge
This is because Cloudflare detects automated browsers like Selenium and presents a challenge that basic Selenium configurations can't solve automatically.
The G2 Scraping Challenge: Understanding the Review Structure
Before attempting to extract data, let's understand what we're trying to scrape. G2 reviews have a structured format that includes:
Review title: Usually a quoted summary of the review
Rating: Displayed as stars (out of 5)
Date: When the review was published
Review text: Broken into sections like "What do you like best?" and "What do you dislike?"
User information: Details about who wrote the review
Here's what a typical G2 review looks like in the HTML structure:
Copy
<div class="paper__bd">
  <div class="d-f mb-1">
    <div class="f-1 d-f ai-c mb-half-small-only">
      <div class="stars large xlarge--medium-down stars-10"></div>
      <div class="time-stamp pl-4th ws-nw">
        <span><span class="x-current-review-date" data-poison-date="">
          <meta content="2025-02-11" itemprop="datePublished">
          <time datetime="2025-02-11">Feb 11, 2025</time>
        </span></span>
      </div>
    </div>
  </div>
  <div class="d-f">
    <div class="f-1">
      <div data-poison="">
        <a class="pjax" href="https://www.g2.com/products/airtable/reviews/airtable-review-10822745">
          <div class="m-0 l2" itemprop="name">"Helped us get a handle on our complicated team-based scheduling and management."</div>
        </a>
      </div>
      <div data-poison-text="">
        <div itemprop="reviewBody">
          <div>
            <div class="l5 mt-2">What do you like best about Airtable?</div>
            <div>
              <p class="formatted-text">The best part about airtable is it's customiizable nature. We worked with a tech specialist to configure Airtable to meet our unique needs and it has so far been adaptable to everything we needed it to do...</p>
            </div>
          </div>
          <!-- More review sections... -->
        </div>
      </div>
    </div>
  </div>
</div>
The Solution: Scrapeless Scraping Browser for Bypassing Cloudflare
Even with advanced Selenium configurations, many scraping projects get blocked by Cloudflare's security systems. This is where Scrapeless Scraping Browser comes in as a game-changing solution.
What is Scrapeless Scraping Browser?
Scrapeless Scraping Browser is a high-performance solution that provides a headless browser environment, allowing you to bypass JavaScript challenges without maintaining your own infrastructure. It integrates with Puppeteer and Playwright for seamless automation and offers:
AI-driven, automatically adapting to the latest security policies
Global coverage for accessing geo-restricted content
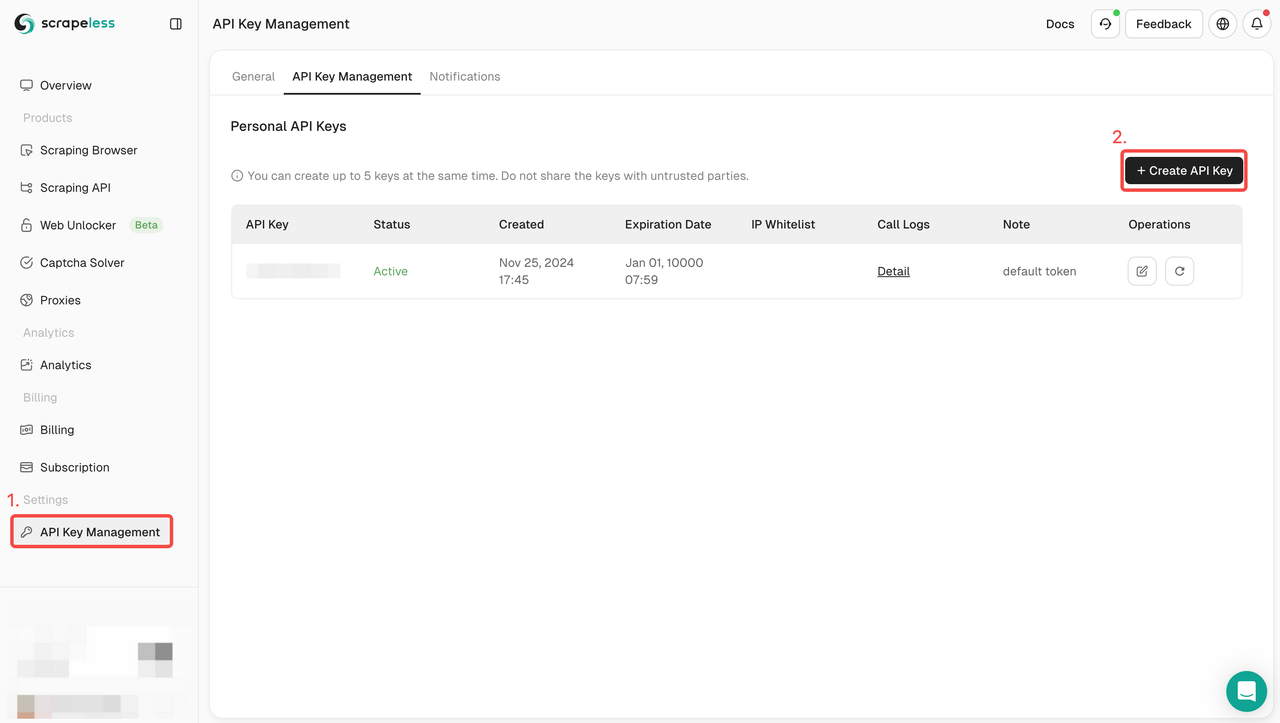
Log in to Scrapeless dashboard immediately and create your API KEY in API KEY management
Using Scrapeless Scraping Browser to Extract G2 Reviews
Now that we understand why standard Selenium with PowerShell struggles with Cloudflare-protected sites like G2, let's implement a solution using Scrapeless Scraping Browser.
Setting Up Scrapeless Scraping Browser with Puppeteer
The most effective way to use Scrapeless Scraping Browser is through Node.js with Puppeteer. Here's how to set it up:
Verify the installation by opening a command prompt and typing:
Copy
node --version
npm --version
Create a Project Folder
Create a new folder for your scraping project
Open a command prompt in this folder
Install Required Package
Install puppeteer-core with npm:
Copy
npm install puppeteer-core
Create Your Scraping Script
Create a file named scrape.js with the following code:
Copy
// scrape.js
const puppeteer = require('puppeteer-core');

async function scrapeG2Reviews() {
  // Replace with your actual Scrapeless API token
  const API_TOKEN = 'YOUR_API_TOKEN_HERE';

  // Configure connection to Scrapeless Scraping Browser
  const connectionURL = `wss://browser.scrapeless.com/browser?token=${API_TOKEN}&session_ttl=180&proxy_country=ANY`;

  console.log('Connecting to Scrapeless Scraping Browser...');

  const browser = await puppeteer.connect({
    browserWSEndpoint: connectionURL,
    defaultViewport: null,
  });

  console.log('Connected!');

  const page = await browser.newPage();

  // Set a longer timeout for navigation
  page.setDefaultNavigationTimeout(120000);

  // Array to hold all reviews
  const allReviews = [];

  // Number of pages to scrape
  const pagesToScrape = 3;

  for (let currentPage = 1; currentPage <= pagesToScrape; currentPage++) {
    console.log(`Navigating to page ${currentPage}...`);

    // Navigate directly to the specific page number
    const pageUrl = currentPage === 1
      ? 'https://www.g2.com/products/airtable/reviews'
      : `https://www.g2.com/products/airtable/reviews?page=${currentPage}`;

    await page.goto(pageUrl, {
      waitUntil: 'networkidle2',
      timeout: 60000
    });

    console.log(`Page ${currentPage} loaded. Taking screenshot...`);

    // Take a screenshot to verify the page loaded correctly
    await page.screenshot({ path: `g2_page_${currentPage}.png` });

    // Wait for the page content to load
    // Try different possible selectors since the structure might have changed
    try {
      console.log('Waiting for content to load...');

      // First try the original selector
      await page.waitForSelector('.paper__bd', { timeout: 10000 })
        .then(() => console.log('Found selector: .paper__bd'))
        .catch(() => console.log('Selector .paper__bd not found, trying alternatives...'));

      // If we're still here, let's check the page structure using another approach
      console.log('Analyzing page structure...');

      // Get the page title to verify we're on the right page
      const pageTitle = await page.title();
      console.log('Page title:', pageTitle);

      // Extract reviews with a more generic approach
      console.log('Extracting reviews...');

      // Try to extract reviews with a more resilient approach
      const pageReviews = await page.evaluate(() => {
        // Look for review containers with multiple selectors
        const reviewElements = Array.from(
          document.querySelectorAll('.paper__bd, .review-item, .reviews-section article, [data-testid="review-card"]')
        );

        console.log(`Found ${reviewElements.length} potential review elements`);

        if (reviewElements.length === 0) {
          // If no reviews found with specific selectors, let's dump the page structure
          const html = document.documentElement.outerHTML;
          return { error: 'No reviews found', html: html.substring(0, 5000) }; // First 5000 chars for debugging
        }

        return reviewElements.map(review => {
          // Try to get title with multiple potential selectors
          const titleElement =
            review.querySelector('[itemprop="name"], .review-title, h3, h4') ||
            review.querySelector('a.pjax div');

          const title = titleElement ? titleElement.innerText.trim() : 'No title';

          // Try to get date with multiple potential selectors
          const dateElement =
            review.querySelector('time, .review-date, [data-testid="review-date"]') ||
            review.querySelector('.time-stamp');

          const date = dateElement ? dateElement.innerText.trim() : 'No date';

          // Try to get rating with multiple approaches
          let rating = 0;
          const starsElement = review.querySelector('.stars, .rating, [data-testid="star-rating"]');

          if (starsElement) {
            // Check for a stars-X class
            const starsClass = starsElement.className;
            const starsMatch = starsClass.match(/stars-(\d+)/);
            if (starsMatch) {
              rating = parseInt(starsMatch[1]) / 2;
            } else {
              // Otherwise check for aria-label that might contain the rating
              const ariaLabel = starsElement.getAttribute('aria-label');
              if (ariaLabel) {
                const ratingMatch = ariaLabel.match(/(\d+(\.\d+)?)/);
                if (ratingMatch) {
                  rating = parseFloat(ratingMatch[1]);
                }
              }
            }
          }

          // Try to get review text with multiple potential selectors
          const textElements = review.querySelectorAll('.formatted-text, .review-content, p, [data-testid="review-content"]');
          let content = '';

          textElements.forEach(el => {
            const text = el.innerText.trim();
            if (text && !text.includes('Review collected by and hosted on G2.com')) {
              content += text + '\n\n';
            }
          });

          return {
            title,
            date,
            rating,
            content: content.trim() || 'No content found'
          };
        });
      });

      if (pageReviews.error) {
        console.log('Error extracting reviews:', pageReviews.error);
        console.log('Page HTML snippet:', pageReviews.html);
      } else {
        console.log(`Extracted ${pageReviews.length} reviews from page ${currentPage}`);

        // Add to our collection
        allReviews.push(...pageReviews);
      }

    } catch (error) {
      console.error('Error on page:', error);
      // Take another screenshot on error for debugging
      await page.screenshot({ path: `error_page_${currentPage}.png` });

      // Dump page HTML for debugging
      const html = await page.content();
      require('fs').writeFileSync(`error_page_${currentPage}.html`, html);
      console.log(`Saved error page HTML to error_page_${currentPage}.html`);
    }

    // Small pause between pages to be nice to the server
    await new Promise(r => setTimeout(r, 2000));
  }

  console.log(`Total reviews extracted: ${allReviews.length}`);

  // Save all reviews to a file
  require('fs').writeFileSync('g2_reviews.json', JSON.stringify(allReviews, null, 2));
  console.log('Reviews saved to g2_reviews.json');

  await browser.close();
  console.log('Done!');
}

scrapeG2Reviews().catch(console.error);
Run the Script
Execute the script with:
Copy
node scrape.js
The JSON Output Format
After running the script, you'll have a g2_reviews.json file with content that looks like this:
Copy
[
  {
    "title": "\"Helped us get a handle on our complicated team-based scheduling and management.\"",
    "date": "Feb 11, 2025",
    "rating": 5,
    "content": "What do you like best about Airtable?\nThe best part about airtable is it's customiizable nature. We worked with a tech specialist to configure Airtable to meet our unique needs and it has so far been adaptable to everything we needed it to do. It has a huge capacity in terms of features and we were able to get it up and running in a fairly short period of time.\n\nWhat do you dislike about Airtable?\nThere are no real downsides except the intial learning curve. I believe we could have built Airtable out as we needed but it would have been a bigger intial time investment. Working with a tech specialist who knew Airtable well really helped us get up and running fast. It was worth the cost."
  },
  {
    "title": "\"Great for organization, has changed our workflow\"",
    "date": "Feb 8, 2025",
    "rating": 4.5,
    "content": "What do you like best about Airtable?\nWhat I like best about Airtable is its flexibility and customizability. It allows us to create databases that perfectly fit our needs, with custom fields, views, and formulas. The ability to link records between tables is incredibly powerful.\n\nWhat do you dislike about Airtable?\nSometimes the learning curve can be steep for new users, especially when dealing with more complex formulas and automations. The pricing can also become quite expensive as your needs grow and you require more records or features."
  },
  {
    "title": "\"Powerful database tool with a spreadsheet interface\"",
    "date": "Jan 29, 2025",
    "rating": 4,
    "content": "What do you like best about Airtable?\nAirtable combines the familiarity of spreadsheets with the power of a database. I appreciate how it allows for different views of the same data - grid, kanban, calendar, etc. It's intuitive enough for non-technical users but powerful enough for complex data management.\n\nWhat do you dislike about Airtable?\nThe free tier is quite limited, and pricing jumps significantly for premium features. Sometimes performance can slow down with large datasets, and there are occasional sync issues when multiple team members are editing simultaneously."
  }
]
PowerShell Integration: Using Scrapeless Scraping Browser from PowerShell
If you prefer working with PowerShell, you can create a wrapper script that calls the Node.js script and processes the results:
Create a PowerShell Wrapper Script
Create a file named run-scraper.ps1 with the following code:
Copy
# File: run-scraper.ps1

Write-Host "Starting G2.com scraping with Scrapeless Scraping Browser..."

# Create output folder
$outputFolder = "G2_Reviews_" + (Get-Date -Format "yyyyMMdd_HHmmss")
New-Item -ItemType Directory -Path $outputFolder -Force | Out-Null

# Run the Node.js script and capture the output
$jsonFile = Join-Path $outputFolder "reviews.json"
node scrape.js > $jsonFile

Write-Host "Node.js scraping complete. Processing results..."

# Check if the file contains valid JSON data
try {
    # Read the file content
    $content = Get-Content -Path $jsonFile -Raw

    # Extract the JSON part (assuming it's the output after all console.log messages)
    if ($content -match '\[.*\]') {
        $jsonContent = $Matches[0]
        Set-Content -Path $jsonFile -Value $jsonContent

        # Parse the JSON to PowerShell objects
        $reviews = $jsonContent | ConvertFrom-Json

        # Export to CSV
        $csvPath = Join-Path $outputFolder "g2_reviews.csv"
        $reviews | Export-Csv -Path $csvPath -NoTypeInformation -Encoding UTF8

        Write-Host "Successfully extracted $($reviews.Count) reviews"
        Write-Host "Results saved to: $csvPath"

        # Basic analysis
        $averageRating = ($reviews | Measure-Object -Property rating -Average).Average
        Write-Host "Average rating: $averageRating out of 5"

        $ratingDistribution = $reviews | Group-Object -Property rating | Sort-Object -Property Name
        foreach ($ratingGroup in $ratingDistribution) {
            Write-Host "$($ratingGroup.Name) stars: $($ratingGroup.Count) reviews"
        }
    } else {
        Write-Error "Could not find JSON data in the output"
    }
} catch {
    Write-Error "Error processing the JSON data: $_"
}
Run the PowerShell Wrapper Script
Open PowerShell
Navigate to your project folder
Execute the script:
Copy
.\run-scraper.ps1
Review the Results
The script creates a dated folder with JSON and CSV results
Basic statistics are displayed in the console
The CSV file can be opened in Excel or other applications for further analysis
Advanced Example: Multi-Page Scraping with Scrapeless Scraping Browser
For a more advanced use case, here's an example that shows how to scrape reviews from multiple pages:
Copy
// File: scrape-g2-multipage.js
const puppeteer = require('puppeteer-core');

async function scrapeG2ReviewsMultiPage() {
  // Replace with your actual Scrapeless API token
  const API_TOKEN = 'YOUR_API_TOKEN_HERE';

  // Configure connection to Scrapeless Scraping Browser
  const connectionURL = `wss://browser.scrapeless.com/browser?token=${API_TOKEN}&session_ttl=300&proxy_country=ANY`;

  console.log('Connecting to Scrapeless Scraping Browser...');

  const browser = await puppeteer.connect({
    browserWSEndpoint: connectionURL,
    defaultViewport: null,
  });

  console.log('Connected! Opening G2.com...');

  const page = await browser.newPage();

  // Set a reasonable navigation timeout
  page.setDefaultNavigationTimeout(60000);

  // Array to hold all reviews
  const allReviews = [];

  // Function to extract reviews from current page
  const extractReviews = async () => {
    return page.evaluate(() => {
      return Array.from(document.querySelectorAll('.paper__bd')).map(review => {
        // Title
        const titleElement = review.querySelector('a.pjax div[itemprop="name"]');
        const title = titleElement ? titleElement.innerText : 'No title';

        // Date
        const dateElement = review.querySelector('time');
        const date = dateElement ? dateElement.innerText : 'No date';

        // Rating
        const starsElement = review.querySelector('.stars');
        let rating = 0;
        if (starsElement) {
          const starsClass = starsElement.className;
          const match = starsClass.match(/stars-(\d+)/);
          if (match) {
            rating = parseInt(match[1])/2;
          }
        }

        // Review content
        const contentElements = review.querySelectorAll('.formatted-text');
        let content = '';
        contentElements.forEach(el => {
          const text = el.innerText;
          if (!text.includes('Review collected by and hosted on G2.com')) {
            content += text + '\n\n';
          }
        });

        return {
          title,
          date,
          rating,
          content: content.trim()
        };
      });
    });
  };

  // Navigate to the first page
  await page.goto('https://www.g2.com/products/airtable/reviews', {
    waitUntil: 'networkidle2'
  });

  // Wait for reviews to load
  await page.waitForSelector('.paper__bd', {timeout: 30000});

  // Take a screenshot of the first page
  await page.screenshot({ path: 'page1.png' });

  // Number of pages to scrape (limit for demonstration)
  const pagesToScrape = 3;
  let currentPage = 1;

  while (currentPage <= pagesToScrape) {
    console.log(`Scraping page ${currentPage}...`);

    // Extract reviews from current page
    const pageReviews = await extractReviews();
    console.log(`Found ${pageReviews.length} reviews on page ${currentPage}`);

    // Add to our collection
    allReviews.push(...pageReviews);

    // Check if there's a next page button
    const hasNextPage = await page.evaluate(() => {
      const nextButton = document.querySelector('a.next_page');
      return nextButton && !nextButton.classList.contains('disabled');
    });

    if (hasNextPage && currentPage < pagesToScrape) {
      // Navigate directly to the next page URL
      currentPage++;
      await page.goto(`https://www.g2.com/products/airtable/reviews?page=${currentPage}`, {
        waitUntil: 'networkidle2'
      });

      // Wait for the reviews to load on the new page
      await page.waitForSelector('.paper__bd', {timeout: 30000});

      // Take a screenshot of the new page
      await page.screenshot({ path: `page${currentPage}.png` });
    } else {
      break;
    }
  }

  console.log(`Total reviews extracted: ${allReviews.length}`);

  // Output all reviews as JSON
  console.log(JSON.stringify(allReviews, null, 2));

  await browser.close();
  console.log('Done!');
}

scrapeG2ReviewsMultiPage().catch(console.error);
Step-by-Step Guide: Getting Started with Scrapeless Scraping Browser
To help you get started with Scrapeless Scraping Browser for bypassing Cloudflare and extracting data from protected websites, follow this step-by-step guide:
Open a command prompt or terminal in your project folder
Run your script with:
Copy
node scrape.js
Check the console output and screenshot to verify the script is working
Step 5: Integrate with PowerShell (Optional)
If you want to integrate with PowerShell, create a wrapper script as shown in the previous section.
⚠️ Want to easily break through the data scraping difficulties and unlock massive amounts of accurate data? Don't hesitate! Sign up for Scrapeless now, and enjoy a free trial without any fees.
Comparing Traditional Methods vs. Scrapeless Scraping Browser
To better understand the value Scrapeless Scraping Browser brings to the web scraping ecosystem, let's compare traditional Selenium with PowerShell methods against Scrapeless solutions:
Feature
Traditional Selenium + PowerShell
Scrapeless Scraping Browser
Cloudflare bypass
Limited, requires extensive customization
99.9% success rate with AI-driven adaptation
Setup complexity
High (requires local WebDriver, maintenance)
Low (cloud-based, no local dependencies)
JavaScript support
Basic, may require custom scripts
Advanced rendering with full JS execution
Anti-detection
Basic (user-agent customization)
Comprehensive browser fingerprinting protection
Scalability
Limited by local resources
Cloud-based infrastructure for high volume
Maintenance
High (regular WebDriver updates needed)
None (managed service)
As shown in the comparison, while Selenium with PowerShell offers a good starting point for web automation, Scrapeless Scraping Browser provides a more robust, scalable, and effective solution for modern web scraping challenges, especially when dealing with anti-bot systems like Cloudflare.
Conclusion
In this comprehensive tutorial, you've learned:
The challenges of using Selenium with PowerShell to scrape Cloudflare-protected sites
How Scrapeless Scraping Browser provides a powerful solution for bypassing Cloudflare
Step-by-step instructions for setting up and using Scrapeless Scraping Browser
Advanced techniques for multi-page scraping and data extraction
How to integrate Node.js and PowerShell for a complete scraping workflow
While Selenium with PowerShell provides a solid foundation for automation, modern web scraping often requires specialized tools to overcome increasingly sophisticated anti-bot measures. Scrapeless Scraping Browser offers a powerful, seamless solution that integrates with existing workflows while eliminating the headaches of maintaining complex scraping infrastructure.
By using Scrapeless Scraping Browser with Puppeteer, you can reliably extract data from Cloudflare-protected websites like G2, opening up access to valuable business intelligence and market research data that would otherwise be difficult to obtain.
Sign up for a free trial at Scrapeless and start extracting data from Cloudflare-protected websites today!
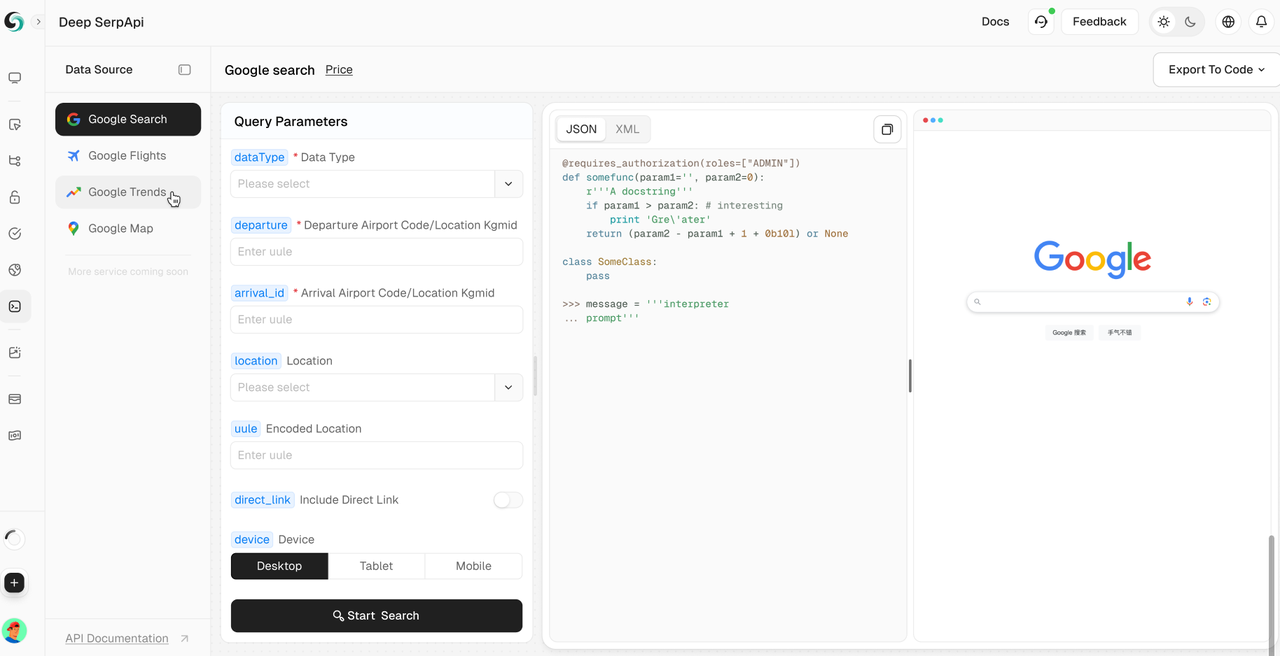
More noteworthy solutions: Scrapeless Deep SerpApi
Deep SerpApi is a specialized search engine API designed specifically for large language models (LLMs) and AI agents. It delivers real-time, accurate, and unbiased information, enabling AI applications to efficiently retrieve and process data from Google and beyond.
✅ Comprehensive data coverage interface: covers 20+ Google SERP scenarios and mainstream search engines.
✅ Cost-effective: Deep SerpApi offers pricing from $0.10 per thousand queries, with a response time of 1-2 seconds, allowing developers and enterprises to obtain data efficiently and at low cost.
✅ Advanced data integration capabilities: can integrate information from all available online channels and search engines.
✅ Get real-time updates with data refreshed within the last 24 hours.
As part of our future roadmap, we are fully committed to meeting the needs of AI developers by simplifying the integration of dynamic web information into AI-driven solutions. The goal is to provide an ALL-in-One API that allows seamless search and data extraction with a single call.
🎺🎺Exciting Announcement!
Developer Support Program: Integrate Scrapeless Deep SerpApi into your AI tools, applications or projects. [We already support Dify, and will soon support Langchain, Langflow, FlowiseAI and other frameworks]. Then share your results on GitHub or social media, and you will receive free developer support for 1-12 months, up to $500 per month.
If you have any questions or need help, feel free to join the Scrapeless Discord community! Not only will you get instant support, but you’ll also be the first to learn about the latest product updates and exclusive offers!
Note: When scraping websites, always respect robots.txt files, website terms of service, and applicable laws. Use the information in this tutorial responsibly and ethically.
At Scrapeless, we only access publicly available data while strictly complying with applicable laws, regulations, and website privacy policies. The content in this blog is for demonstration purposes only and does not involve any illegal or infringing activities. We make no guarantees and disclaim all liability for the use of information from this blog or third-party links. Before engaging in any scraping activities, consult your legal advisor and review the target website's terms of service or obtain the necessary permissions.